Clipping Path

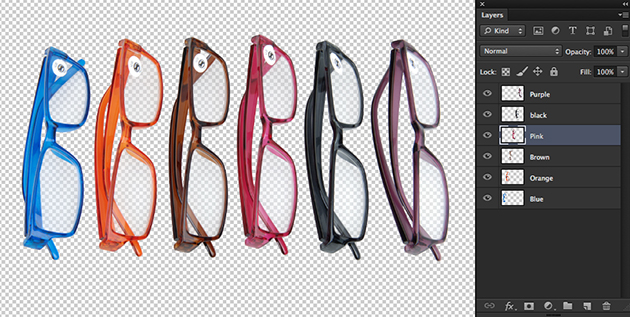
Easy Cutouts for web images with the Object Select Tool in Photoshop

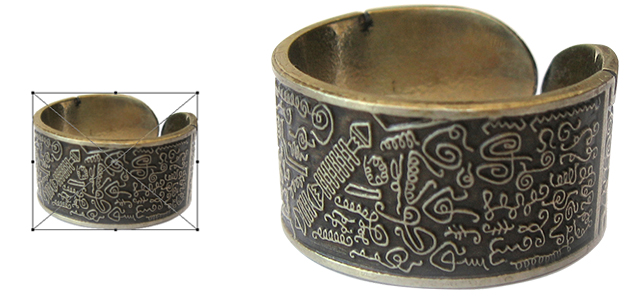
The “Object Select Tool” is a new and very handy feature in Photoshop CC 2020. It’s a great way to cutout an object quick and easy. Here’s how you can do it.             The Object Select Tool The new “Object Selection Tool” can be found in Photoshop in the “Select and Mask” dialog box or you can it in the tool bar on the left, below the lasso.           Rectangular selection and lasso There are two options for tracing around an object, Rectangle and Lasso. You can use the rectangle tool to select the object within a rectangular shape. You can use lasso tool for a free shape selection.      

Read More »

Removing edge halos after cutout

When we cutout images specially with automatic selection tool in photoshop and apply contrasting background behind it, we often get unwanted fringing that’s comprised of stray pixels, and looks like a fuzzy halo around certain parts of the image. With the help of defringe option in photoshop, we can get rid of such fringes of the image. After opening image in photoshop, with selection of foreground layer click Layers > Matting> Defringe. Enter pixel value for defringing. Really easy way to remove it, isn’t it?

Read More »

Auto script to save layers as files

In many cases, we are required to save different layers as separate files at the end of image processing. Especially, when we are working with group product image, where each product in the image needs to be processed and saved as separate files. In such case, it might be good to save each layer as different files manually when you are working with few files. But just imagine if we are doing same thing for hundreds of group images at the same time. Even saving different layers as separate files can be time consuming task. We can do this process automatically through auto script available in Photoshop CS6. File > Script > Export layer to Files Here is an example

Read More »

Creating logo using Photoshop CS6

Photoshop is massively used for photo editing, adding effects and creating graphic designs and web designs. It is better known for its pixel based output. Nevertheless, Photoshop also contains tools to help create logos that can be used for prints and various media platform. We no more have to fear that logo created in Photoshop will lose its quality when enlarged to larger dimension or resolution. Using simple tools of Photoshop CS6, we can easily create vector quality logos. This post will be helpful for ones who don’t possess Illustrator or any other vector based software for such purpose. Let’s take a small jpeg logo image as reference to trace. Following image below is small size image which when enlarged

Read More »

Re-sizing images maintaining quality

While using transform tool, you must have noticed that while transforming the image size – the quality of transformed image gets degraded. We can avoid this to certain extent and maintain the quality of the image using the smart object tool. If the same image is converted to smart object by clicking Image Layer – Right click and select convert to smart object, this converts the rasterized object to smart object and hence, when enlarged the quality of image doesn’t get degraded to certain extent. Here is an example to show you the difference: 1. Enlarged image using Transform tool  2. Enlarged image using Transform tool after converting it to smart object

Read More »

Perspective Crop Tool

Photoshop CS6 has reinvented its crop tool which will make its user fallen in love with it. With the added Perspective crop tool, it’s just matter of few clicks to change the perspective of certain part of an image. Let’s check this out with the example image below: Raw Image: Open the image and select Perspective crop tool from the crop tool menu option of the tool bar. Select area which needs to be cropped. Then click commit button or press Enter key.  You will see Photoshop automatically changes the perspective of selected area. See the example images below to see the end result. Use of Perspective Crop Tool:   End Result:

Read More »