Color Correction

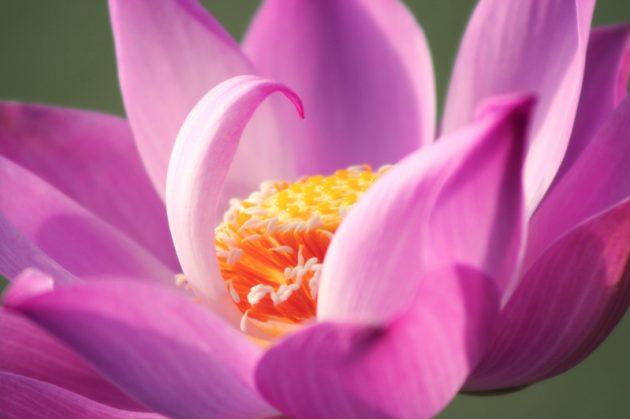
High- End Clipping for Hair and Fur in images

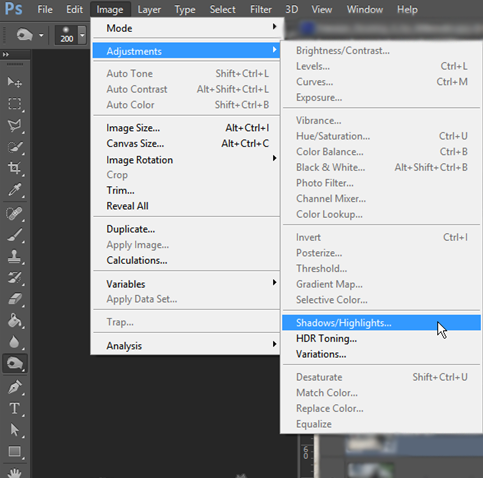
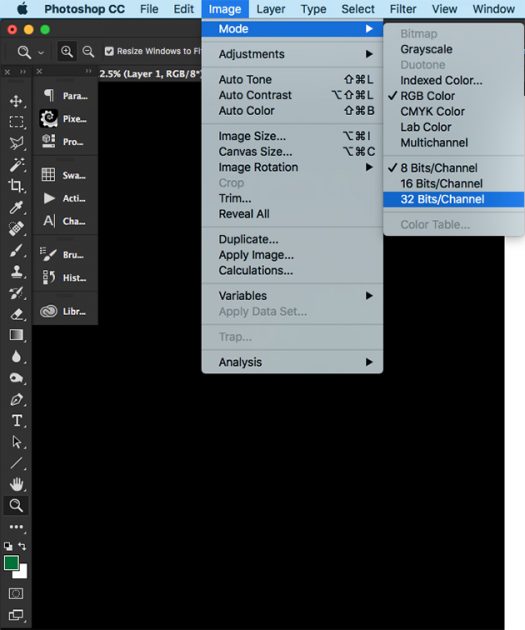
Working on images that require high-end quality is quite complicated, unless one knows the tricks. For processing any images into design, image clipping is one of the first part that needs to be considered for the quality output.Usually most designs need a normal clipping of an image. But when it comes to high-end printing, detailing part is the most important thing to keep in mind.For processing / clipping the image, basic way of processing an image, at first is by using “magic wand” tool for selection of edges and using the “select and mask “tool for the hair clipping. In this way, any image can be easily clipped if the processed image quality is not in question. To achieve a

Read More »

Shadows/Highlights Adjustment on Photoshop

The Shadow/Highlight command is one method for correcting photos with dark or dull images due to strong backlighting or correcting subjects that have been slightly washed out.The adjustment can also be used for brightening areas of shadow in an otherwise well‑lit image. The Shadow/Highlight adjustment that we are going to use is destructive in nature. So it’s better first to create a duplicate layer and then proceed. So press Ctrl+J/Cmd+J to duplicate your layer. Now go to Image>Adjustment>Shadow/Highlight. After clicking on Shadow/Highlights a new popup box will open which is loaded with two sliders i.e. Shadow and Highlight. To reveal more features, click on Show More.After clicking on Show More option your panel should look like this.        

Read More »

Bit Depth

  Bit Depth The word bit comes from two words, binary and digit. Bit depth refers to the color information stored in an image. Bit means it’s amount of tonal variation in the image. Understanding the tonal values within an image can help you obtain the best print possible. There are 3 type of bit depth on photoshop.  8-Bit Depth 8 Bit images have 256 colors.Each Color of an image in RGB (Red, Green, Blue) is created from a gradient from black to white. There are 256 shades of grey between Absolute Black and Absolute White. This means that Red has 256, Green has 256 and Blue has 256. The math is 256x256x256=16.7 Million Colors possible. 16-Bit Depth It is

Read More »

Quick White Balance Correction in Camera Raw & Photoshop

White balance is the process of removing unrealistic color casts, so that objects which appear white in person are rendered white in your photo. White balance in digital photography means adjusting colors so that the image looks more natural. We go through the process of adjusting colors to primarily get rid of color casts, in order to match the picture with what we saw when we took it. Raw Image from freeimages.com Camera Raw Method :  Open your image in the Camera RAW editor then go Filter>Camera Raw Filter and select the “White Balance Tool” within the Tools bar at the top of the “Camera Raw” dialog box to adjust the white balance in camera raw images, click the “White Balance

Read More »

Differences Between File Formats (PSD, TIFF, PNG, JPEG)

Photoshop users already know that there are various file formats in which the images can be saved. The file formats are there to cater the specific needs in terms of quality and use of the image. Here’s an insight into what the file formats stand for. Adobe Photoshop default (PSD) PSD file is a layered image file used in Adobe PhotoShop (PSD), which stands for Photoshop Document, is the default format that Photoshop uses for saving data. PSD is a proprietary file that allows the user to work with the images  individual layers even after the file has been saved. TIFF (Tagged Image File Format) TIFF is a lossless file format which is popular among graphic artists, photographers, and publishers.

Read More »

Reduce PSD File Size Without Quality Loss

Reduce PSD File Size without Quality Loss When file size is heavy, unnecessarily much time is spent. File size matters when sharing via any means. As a solution to lessen file size, many designers reduce the resolution of their PSDs which results on reduced quality as well. With some simple tricks mentioned below, file size of a PSDs can be reduced without losing its quality. You can either follow one or all of the options below to reduce file size. 1. Put a solid white layer on Top Photoshop’s high quality file previews are weighty. Hide all your work behind a solid white layer on Top.  2. Only keep the Essentials It’s easy to forget some of the junk that accrues as

Read More »