Image Manipulation

Restyling your room’s walls & floors using Photoshop

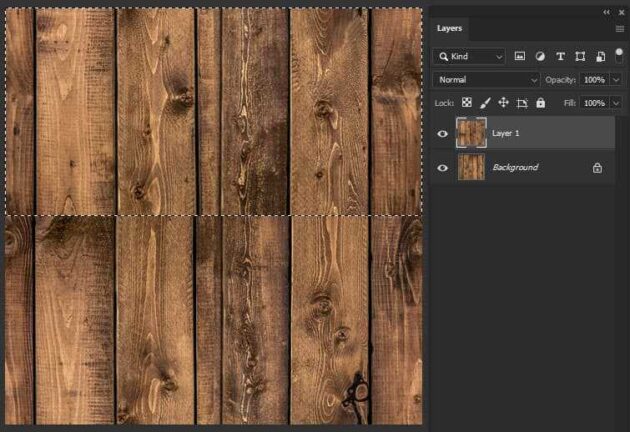
There may be times when you would like to imagine the walls of your house with new wallpaper and/or the floors with new tiles or parquet. Before you actually go ahead with the project, wouldn’t it be nice to actually see how the end result will turn out with your choices? This can be done by transforming a realistic image into a seamless pattern in Photoshop. In the past turning images into seamless repetitive patterns was a difficult job. Nowadays this can be done quite easily. In this article we’ll guide you step by step through the digital restyle of your room’s wall or floor. For the pattern, we have chosen a vertical wooden pattern of size 500 X 500

Read More »

Create 3d text in Photoshop

Creating own 3d text has become really simple since introduction of CS6 version of Adobe Photoshop. There are different 3d options available in latest version of Photoshop which has broaden its scope for designers from different fields. Today we will look at how to create 3d text in Photoshop with few clicks. Here’s a small example how you can create your own 3d Text: Step 1: We have taken following Image to add text “Meow” on it. Step 2: Right click on the text layer and select: “New 3D extrusion for layer” Option. A box pops up which says switch to 3d workspace. Click “yes” to begin. Step 3: After you switch to 3d workspace, you text layer is changed

Read More »

Create a tiny little world

Some imaginative experiments never got simpler. Photoshop has got various features and filter plugins to simply make a creative curious image editing. Since Adobe Photoshop CS 6 version, filter named “POLAR COORDINATES” is available which turns a panoramic image into 360 degree that makes image look like a planet. Let us demonstrate how to create a tiny planet: Step 1: Choose a right image. The most important part for this filter is good amount of constant sky and a constant ground without any breaks in-between having clean edges. Selecting image may take some more time than technique itself. So, we prefer trying different images for quick results. For this example, we have used an image that has a clear sky

Read More »

Smart Object Liquify

Liquify is really nice tool to make lots of adjustments in images. Earlier users didn’t prefer to apply it due to its destructive nature. The effect used to get merged in the layers itself when this filter was applied. With updated version of Photoshop CS6.1 onwards, we can find new feature where we can apply Liquify filter to Smart Objects. That means even after applying this filter, we can reopen its dialog and carry on working from where we left off. With the help of it, we can now apply any tool further more or revert the image to its original state. This has made Liquify more user friendly feature as we always have the opportunity to change our mind

Read More »

Create a Realistic Depth of Field

Every person wants to capture images as good as a Photographer but most of the image tend to be simple when captured. Adobe Photoshop has updated its new features Blur Gallery where photographers/ designers can simply manipulate an image such that focus is on particular subject as a result of depth of field. We can achieve different effects via Blur Gallery tools. Lets check out with an example. We have taken image of car as a sample. Go to “Filter > Blur Gallery > Field Blur “. A Blur tab pops up where you can adjust various blur effects. On Field Blur, click on the image to place blur field. You can add as many points as you like, here

Read More »

Adobe DNG Converter

DNG stands for Digital Negative, It’s an open source of raw file format developed by Adobe. DNG is also said as future proof format. Using different multiple camera and processing raw file got simpler using DNG Converter. This Dng format is supported by most of the software manufactures and camera manufactures, and possess all the original property file format information. Editing the raw file creates an XMP file format whereas editing DNG raw format holds XMP into it, this is one of the big advantage. This file format is 15-50% smaller due to better compression maintaining its high quality. This DNG format is very user friendly, since it has the feature of setting its compatibility camera raw setting that can

Read More »