
Lord Ganesha
Designed by- Ananda Maharjan; Download: 1280 X 1024, 1440 X 900, 1680 X 1050, 1920X1200
Power
Designed by- Manish Shakya; Download: 1280 X 1024, 1440 X 900, 1680 X 1050, 1920 X1200
Namaste !!
Designed by- Ananda Maharjan; Download: 1280 X 1024, 1440 X 900, 1680 X 1050, 1920 X 1200
Design
Designed by- Ananda Maharjan; Download: 1280 X 1024, 1440 X 900, 1680 X 1050, 1920 X 1200
Removing freckles
Want to remove freckles from your image? Here is the quickest method to do so in Photoshop. After opening your file, change the image mode to CMYK mode and choose the channel layer in which freckles are more visible. Like in example below, freckles were most visible in yellow channel layer. Copy that channel layer and change the image mode back to RGB mode. Now, paste it on the new layer above the existing layer in the layer palette. Inverse

Focus Mask
There is a new add up feature in Photoshop CC 2014 – Focus Mask, for selecting images based on focus area. With the help of this tool it is very quick and easy to cut out images in limited period of time. Go to – Select > Focus Area Photoshop will automatically analyse the image based on focus area. As per our requirement, we can add or subtract other areas of image. We can also adjust parameters option for a better result. With Auto button turned on it helps to pick correct depth of field automatically. For even better result we can also make adjustment in the Refine mask option. Here is an example of before and after the mask
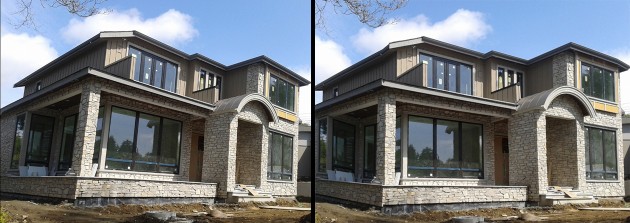
Perspective Warp in CC 14.2
All photographers do not get correct perspective in images whether it is a one point, two points or three point perspective photography. Every time re-shooting images to make the correct perspective isn’t an option. Photoshop CC 14.2 gives us a new feature as a solution to issue of perspective using a new 3D feature grids named as Perspective Warp. It is improvised feature of old tools like distort transform option, vanishing point etc. Let’s check out one example done with new “Perspective Warp” tool. Raw Image: Go to Edit > Perspective Warp. Similar to vanishing point, select the area that needs to be corrected. New thing, here you can drag two or more than two boxes depending upon the perspective