Image Retouche

Restyling your room’s walls & floors using Photoshop

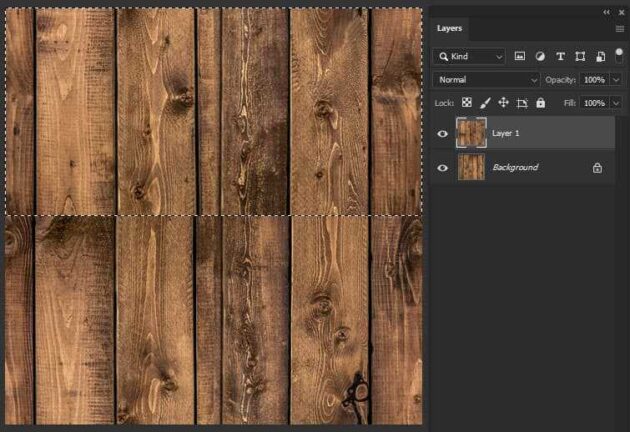
There may be times when you would like to imagine the walls of your house with new wallpaper and/or the floors with new tiles or parquet. Before you actually go ahead with the project, wouldn’t it be nice to actually see how the end result will turn out with your choices? This can be done by transforming a realistic image into a seamless pattern in Photoshop. In the past turning images into seamless repetitive patterns was a difficult job. Nowadays this can be done quite easily. In this article we’ll guide you step by step through the digital restyle of your room’s wall or floor. For the pattern, we have chosen a vertical wooden pattern of size 500 X 500

Read More »

Quick Portrait Retouche

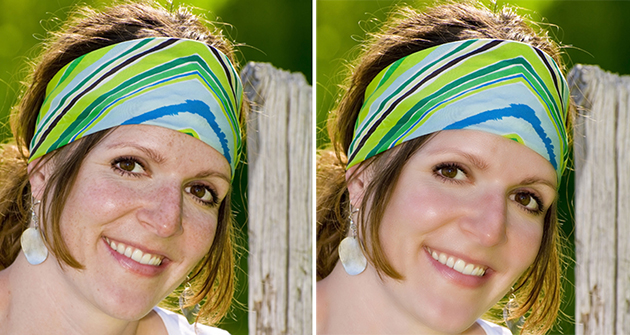
Everyone wants to look beautiful in their image but in reality it doesn’t happen while taking photos. Retouching each blemishes, spots and inequalities with healing, patch or clone tool is time consuming and hectic process. Today we will look at quick and better technique to retouch such images. We have taken image of a beautiful lady with disturbing skin pours and blemishes as our sample.                                       Duplicate background layer as Layer 1 and convert it to smart object. Then go to Filter and apply surface blur with radius value around 30 and threshold value 31. You can adjust those values later again

Read More »

Smart spot removal in CC

One of the interesting features in CC is its Camera Raw updates. With new camera raw update, we can now use this feature in any file format, even if image is not taken in raw format initially. Today we will be looking at new tool in camera raw dialog box – Spot removal tool which is useful in removing unwanted part of the image in just a few clicks. Before starting with it, convert your file to smart object and apply filters as non-destructive sub layers. Main advantage of doing this is: filter will now appear as sub-layer. This allows you to hide filter effect any time from Layers panel as well as by double clicking the filter sub-layer; you

Read More »

Photoshop CC Feature: Shake Reduction

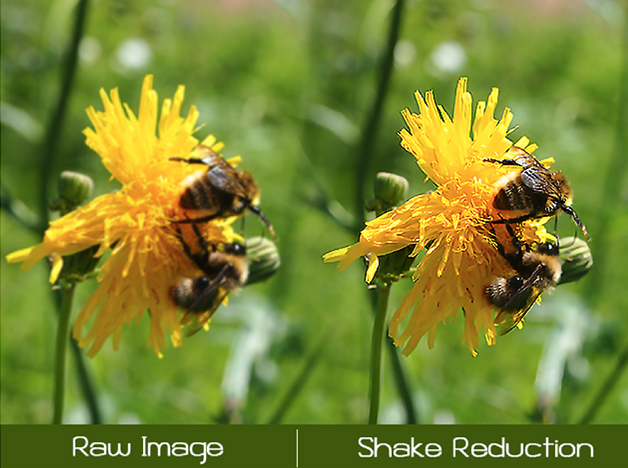
We posted about Intelligent Unsampling earlier, upgraded feature of Photoshop CC. Giving continuity to this, we have come up with the new feature: Shake Reduction on Photoshop CC. As a photographer, we have known many times due to camera shake and vibration our photo wouldn’t be as nice as the result we want. There aren’t always chances to re-photograph in such cases. So Photoshop CC has its added feature ‘Shake Reduction’ for which photographers likely didn’t think possible. Therefore this feature of photoshop CC has become the most advantageous feature for photographer recently. This new feature especially eliminates or at least minimizes the image blurring present if the camera vibrated or was shaken during the exposure. It automatically reduces image

Read More »

Removing blemishes

Everyone using photoshop must have used clone tool, heal tool or patch tool for removing pimples and blemishes. Today we will look at new method that will do the same work in pretty less time. Get an image of a model with needs skin retouche.                                             Duplicate layer and then in the layer palette, change the blending option to “Vivid light” and invert using Image > Adjustment > Invert (Shortcuts: Ctrl + I / Command + I). Then go to Filter > Blur > Gaussian Blur. Adjust the value of the blur to the level where blemishes are less

Read More »

Replacing one image over another

Suppose that you want to place an image over another one in right perspective and position; traditionally for this, we copy one image and paste it over another image and then use transform, wrap or perspective tool to adjust it. You won’t be satisfied yet after spending quiet a long time as images doesn’t fit in right perspective through manual transforming and adjustments. We have a better alternative in Photoshop to ease this process in less time and with perfect placement. Here is an illustration how to achieve it with the Vanishing point tool in Photoshop: Image 1: Image of monitor Image 2: Image of scenery Objective: Place Image 2 in the screen of Image 1. Solution in few steps:

Read More »