Create a Realistic Depth of Field
Every person wants to capture images as good as a Photographer but most of the image tend to be simple when captured. Adobe Photoshop has updated its new features Blur Gallery where photographers/ designers can simply manipulate an image such that focus is on particular subject as a result of depth of field. We can achieve different effects via Blur Gallery tools. Lets check out with an example. We have taken image of car as a sample. Go to “Filter

Image Editing with Camera Raw Filter
Adobe has updated it Photoshop CC with the new feature of Camera Raw Filter. In past Camera Raw was used by Photographers for editing Raw Images. Now Adobe has introduces its new filter which can not only edit Raw/DNG, Jpeg or Tiff format but can edit in Layer type. Editing an image using different adjustment layers can take longer time / hard work where Camera Raw Filter stands alone for overall image editing in limited period of time. This can

Automating camera raw settings
Imagine you did 360 degree photo-shoot of a product and now you are not happy with the lightning, color, sharpness and size of your image. Will you work on 360 images individually to do same thing? Answer is a big “NO”, if you know about automating feature in camera raw settings available in Adobe bridge itself. Adobe bridge has a “Save Settings” feature that can copy settings applied to one image and apply to multiple other images with one click. To

Adobe DNG Converter
DNG stands for Digital Negative, It’s an open source of raw file format developed by Adobe. DNG is also said as future proof format. Using different multiple camera and processing raw file got simpler using DNG Converter. This Dng format is supported by most of the software manufactures and camera manufactures, and possess all the original property file format information. Editing the raw file creates an XMP file format whereas editing DNG raw format holds XMP into it, this is

Focus Mask
There is a new add up feature in Photoshop CC 2014 – Focus Mask, for selecting images based on focus area. With the help of this tool it is very quick and easy to cut out images in limited period of time. Go to – Select > Focus Area Photoshop will automatically analyse the image based on focus area. As per our requirement, we can add or subtract other areas of image. We can also adjust parameters option for a

Shadows/Highlights Adjustment on Photoshop
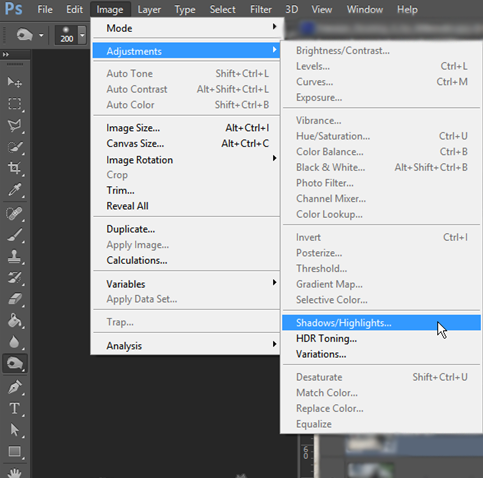
The Shadow/Highlight command is one method for correcting photos with dark or dull images due to strong backlighting or correcting subjects that have been slightly washed out.The adjustment can also be used for brightening areas of shadow in an otherwise well‑lit image. The Shadow/Highlight adjustment that we are going to use is destructive in nature. So it’s better first to create a duplicate layer and then proceed. So press Ctrl+J/Cmd+J to duplicate your layer. Now go to Image>Adjustment>Shadow/Highlight. After clicking on Shadow/Highlights a new popup box will open which is loaded with two sliders i.e. Shadow and Highlight. To reveal more features, click on Show More.After clicking on Show More option your panel should look like this.

Bit Depth
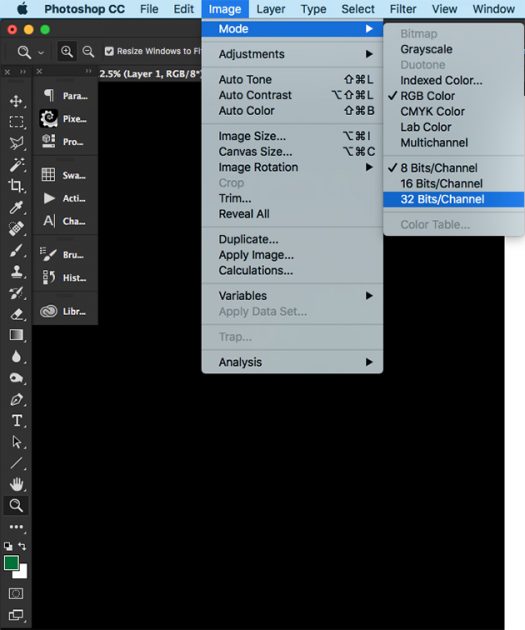
Bit Depth The word bit comes from two words, binary and digit. Bit depth refers to the color information stored in an image. Bit means it’s amount of tonal variation in the image. Understanding the tonal values within an image can help you obtain the best print possible. There are 3 type of bit depth on photoshop. 8-Bit Depth 8 Bit images have 256 colors.Each Color of an image in RGB (Red, Green, Blue) is created from a gradient from black to white. There are 256 shades of grey between Absolute Black and Absolute White. This means that Red has 256, Green has 256 and Blue has 256. The math is 256x256x256=16.7 Million Colors possible. 16-Bit Depth It is

